You want to get the best price for your Nintendo Switch, and its physical and functional condition drives what buyers will pay. A fully working Switch with intact Joy‑Cons, a charged battery, and minimal cosmetic damage earns the highest offers; significant damage, missing accessories, or nonfunctional controls lower trade‑in or resale value.
This guide shows exactly which defects matter, what buyers like Gizmogo look for, and the simple steps you can take to boost your payout before you sell. Expect clear checks for functionality, a checklist for cleaning and resetting the console, and realistic expectations for how much each issue will affect your offer.
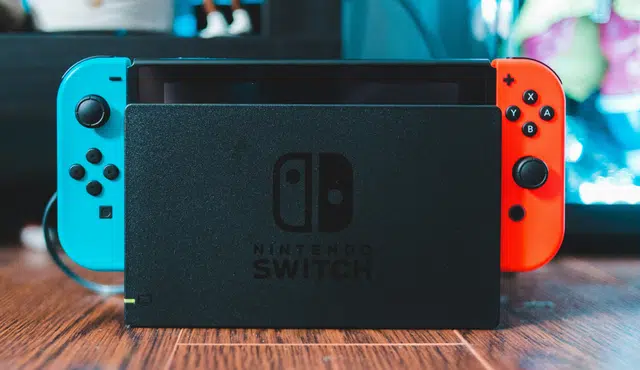
Nintendo Switch Condition Requirements for Selling
You should expect buyers or trade-in services to check physical condition, included parts, and core functions. Knowing exactly which defects are acceptable and which will reduce value lets you set a fair price and avoid surprises at inspection.
Physical Condition Expectations
Describe visible damage honestly and measure its extent. Small cosmetic scuffs on the dock or Joy‑Con rails usually lower offers slightly. Deep scratches on the screen, cracks in plastic, or broken mounting tabs on the dock will cause larger deductions or rejection.
Cleanliness matters. Remove dust, fingerprints, and game card residue. Replace or repair heavily yellowed or warped plastic where feasible, since discoloration signals aging to buyers.
Check serial numbers and model type. Bent USB‑C ports, missing serial labels, or aftermarket shell replacements can reduce trust and value. Photograph damage clearly when listing.
Essential Accessories and Components
Include the essentials to maximize resale value: the Switch console, both Joy‑Con controllers (or a Pro Controller), the official dock, AC adapter, and an HDMI cable. Buyers expect an HDMI cable with docked units for TV play; missing HDMI often reduces offers.
Original packaging and manuals add value but aren’t required. If you lack original items, list compatible replacements and their condition.
Label third‑party accessories clearly. Unbranded or defective chargers will be noted and may lower trade‑in offers.
Functionality Checks
Verify that the console powers on, boots to the Home Menu, and updates without errors. Test touchscreen responsiveness across the entire display and check for dead pixels or discoloration.
Test Joy‑Con inputs, analog sticks (for drift), shoulder buttons, and attachment/detachment with the rails. Confirm Bluetooth pairing, wireless connectivity, and that the battery charges to at least reasonable capacity. Dock the unit and confirm TV output over HDMI, including stable video and audio.
Run a quick boot into a game to confirm save/load operations if possible. Report any intermittent crashes, error codes, or overheating issues before selling.
Accepted Wear and Common Issues
Minor wear like shallow surface scratches, light scuffing on Joy‑Con faces, and small dock abrasions are commonly accepted with a small price reduction. Worn box art, faded labels, and missing paperwork typically have minimal impact.
Common disqualifiers or major devaluers include: severe screen cracks, nonfunctional Joy‑Con sticks with persistent drift, broken USB‑C charging ports, and dock HDMI faults. Cosmetic repairs that don’t affect functionality—like replacing rubber feet or cleaning contacts—can restore some value.
If the system has replacement parts or third‑party repairs, disclose them. Transparency avoids disputes and speeds up transactions. For trade‑in services and buyers, accurate condition descriptions often result in better final offers.
Steps to Prepare Your Nintendo Switch for Sale
Follow precise steps so your data stays safe, the console looks its best, and the buyer gets a complete package. Back up saves, remove accounts and personal info, clean the unit, and collect chargers and accessories before listing.
Back Up and Transfer Your Save Data
If you have a Nintendo Switch Online membership, enable cloud saves in System Settings > Data Management > Save Data Cloud Backup and upload each user profile’s save files. For non-subscribers, use the system-to-system transfer: connect both consoles to Wi‑Fi, sign in with the same Nintendo Account, then follow System Settings > Users > Transfer Your User and Save Data.
Manually move screenshots and videos to an SD card or a PC if you prefer a local copy. Confirm saves appear on the new console or in the cloud before proceeding. Do not skip verification — losing progress can be irreversible for some games.
Remove Personal Information and Reset
Unlink your Nintendo Account from the console: go to System Settings > Users > your user > Unlink Nintendo Account. Deactivate the console as your primary device for eShop purchases in Account settings if applicable.
Perform a factory reset to erase local data: System Settings > System > Formatting Options > Initialize Console. Remove any microSD card during reset or choose to format it separately. After resetting, power on the console to confirm it boots to the initial setup screen so the new owner won’t receive your accounts.
Clean the Console and Gather Accessories
Thoroughly clean the console and Joy‑Cons with a microfiber cloth dampened slightly with 70% isopropyl alcohol. Avoid liquid ingress around buttons and the cartridge slot. Clean Joy‑Con rails and thumbsticks, and check for drift or sticky buttons to disclose any issues.
Gather the original AC adapter, HDMI cable (if selling with a dock), dock, Joy‑Con straps, and any included games or cases. If you lack original boxes, take clear photos of all items and note missing parts in the listing. Including chargers and an HDMI cable raises buyer confidence and often increases sale value.
Transfer or Erase Screenshots and Videos
Open the Album and review all media. Transfer desired screenshots and clips to a microSD card or copy them to a PC via a USB connection or by removing the SD card. For many buyers, curated screenshots of system condition and included games help listings sell faster.
After transferring, delete all remaining items from the Album and perform a final check. Ensure no personal photos, chat logs, or identifiable information remain. Once the console is reset and the Album clear, the device will be ready for a secure sale.